


How to Use Wi-Fi Pause Scheduler (Parental Controls Lite) and WAN DNS Settings (Safe Browsing/Family Filter) on Hitron ARIA 2210
Applies to: Hitron ARIA 2210 (Wi-Fi 6 Router)
Best for: Limiting kids’ Wi-Fi time, bedtime curfews, security protection against malware/phishing and blocking adult content
Part 1 — Wi-Fi Pause Scheduler (Device Internet Control)
What This Feature Does
The Wi-Fi Pause Scheduler lets you control internet access per device:
✅ You can:
-
Pause the internet instantly for a specific device
-
Set recurring schedules (bedtime, homework hours, weekends)
-
Block a device completely (hard block)
⚠️ This is “parental controls lite” — it controls internet access, not what they do inside apps.
Step 1 — Log into Your ARIA 2210 Router
-
Connect to your Wakey Wi-Fi network
-
Open a browser and go to the router login page at http://192.168.0.1
-
Log in using your router admin credentials
✅ Tip: If you changed your router IP range, the router login page may be different.
⚠️ The default username is "cusadmin". Password would be the customer password you created during the initial setup process of the router. If you forgot your password, your only option is to Reset the Aria 2210 router to factory default settings and once reset, Setup the Aria 2210 router.
Step 2 — Find the Device You Want to Control
Go to: Overview → Connected devices
You’ll see a list of connected devices including their:
-
Device name
-
Connection type (2.4G / 5G)
-
IP address
-
MAC address
-
Status (active/inactive)
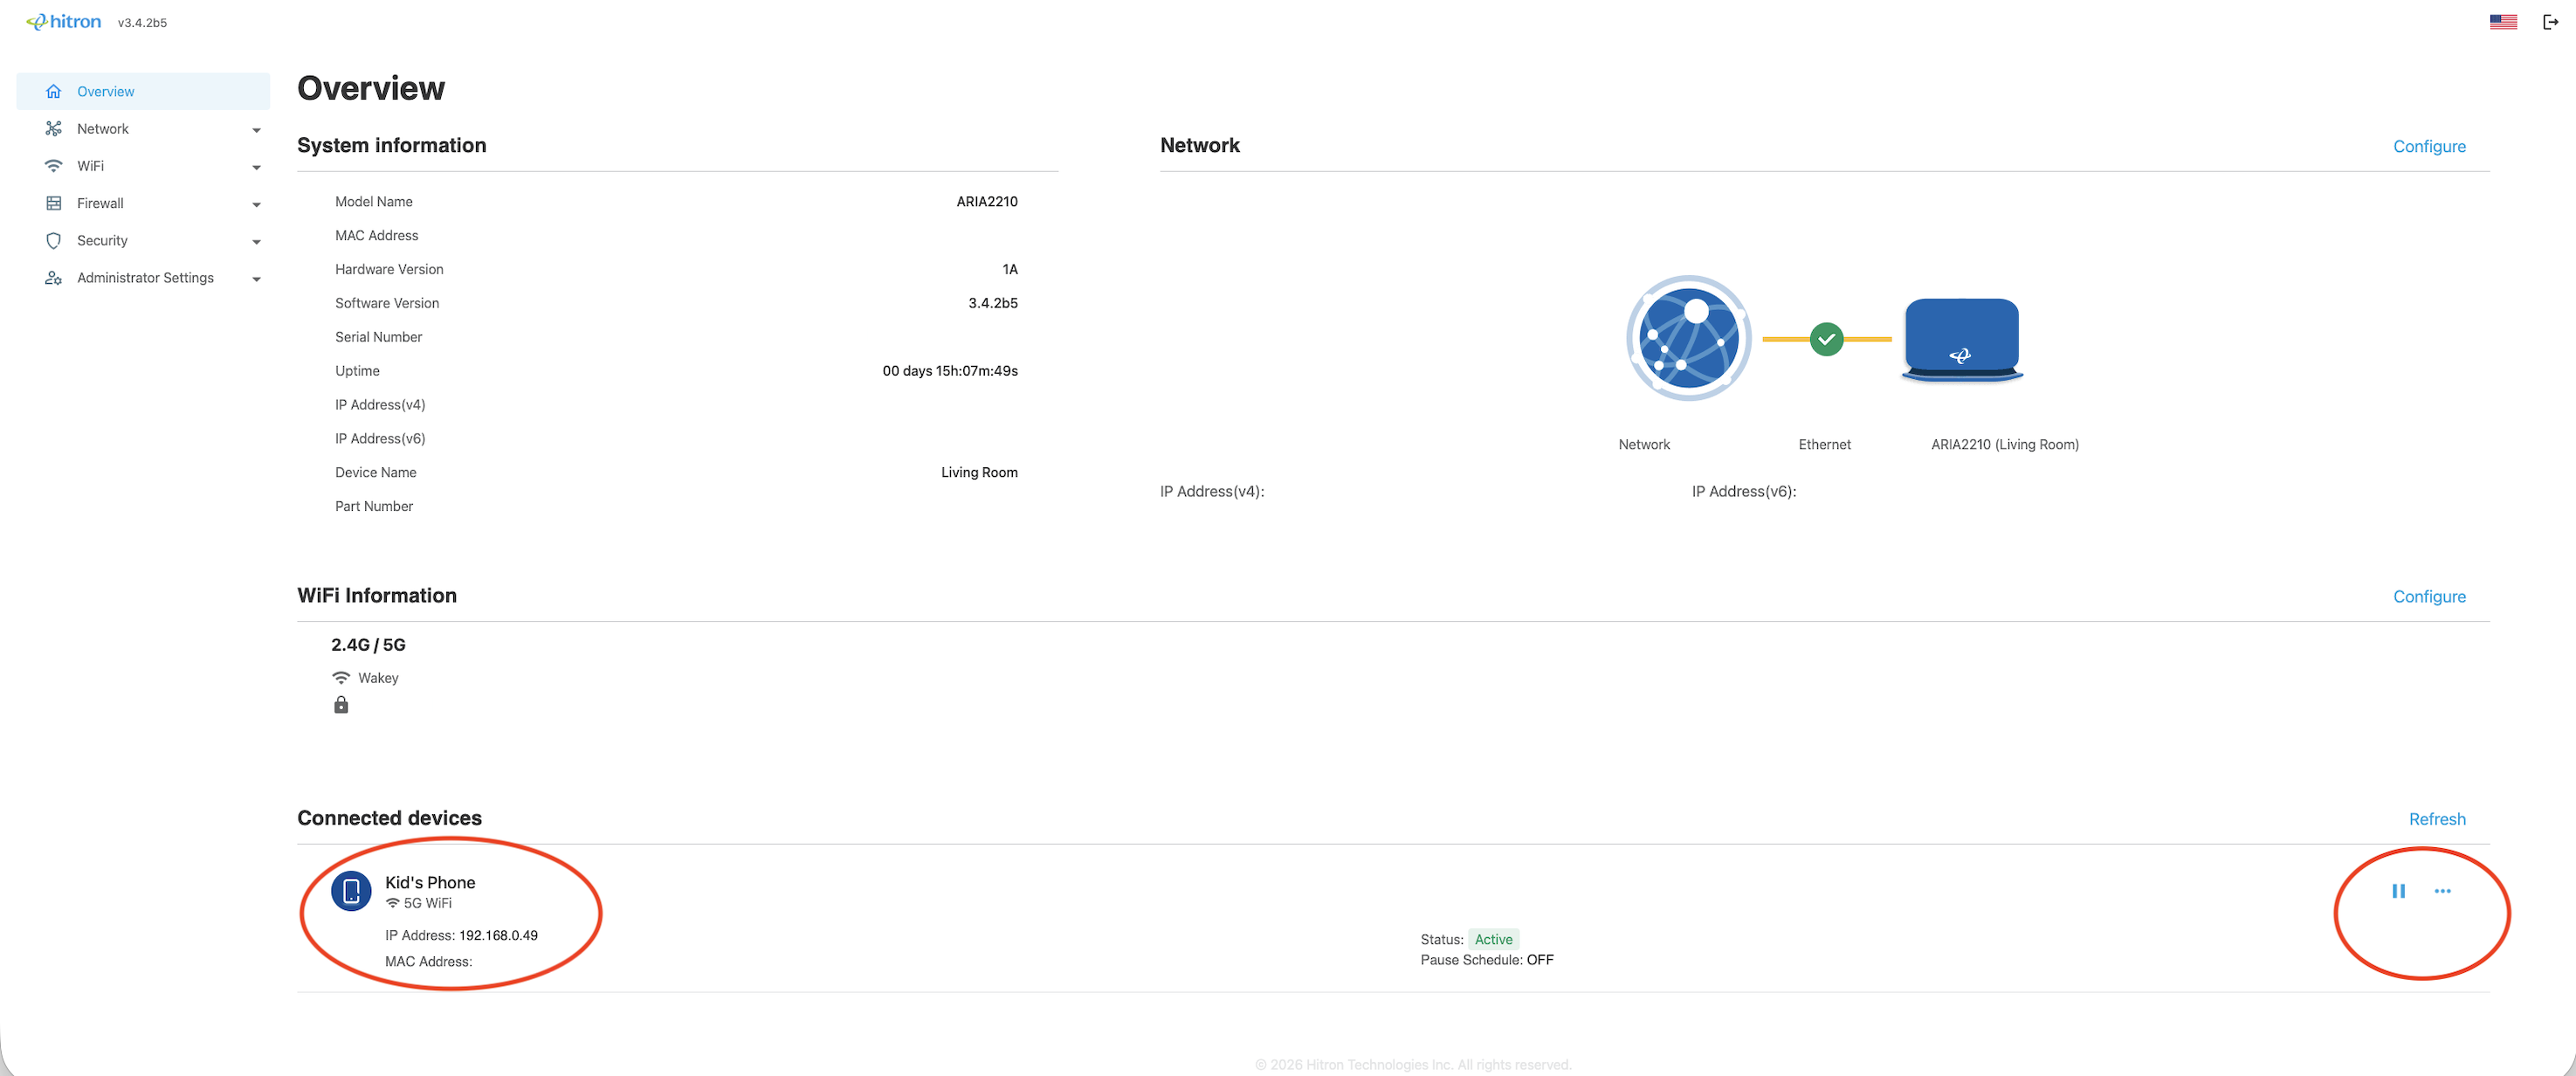
This screenshot above shows the Connected devices list and the options button (three dots) for each device.
Step 3 — Open the Schedule Menu
-
Find the device you want to restrict (example: a phone/tablet)
-
Click the three dots (…) on the right side
-
Select Schedule
Step 4 — Create a Pause Schedule
You will now see the Manage Pause Schedule page.
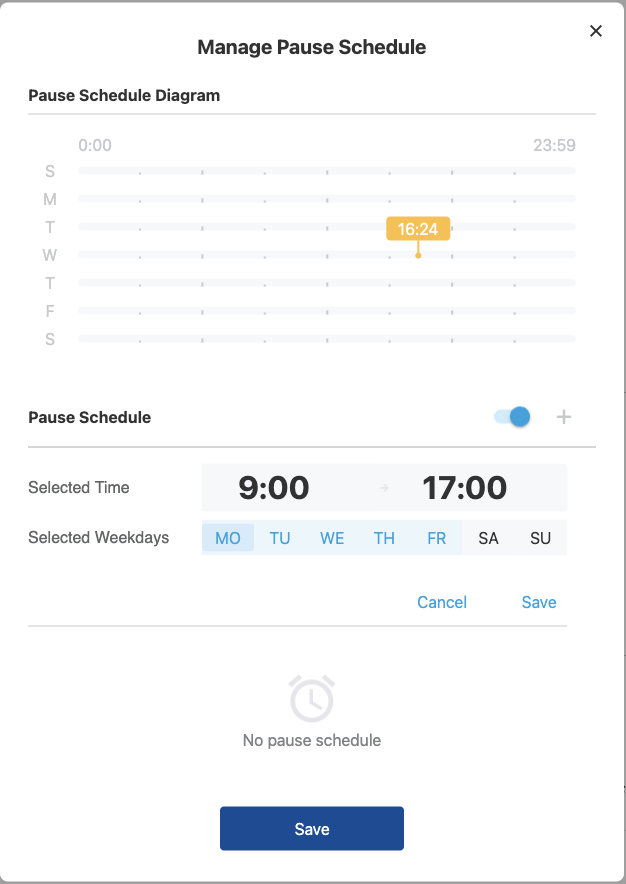
This screenshot above includes:
-
Weekly schedule timeline
-
Pause toggle (enable/disable)
-
+ (plus) icon to add a schedule block
Step 5 — Add a Time Block (Curfew / Homework Hours)
-
Click +
-
Choose:
-
Start time
-
End time
-
Days (Sun–Sat)
-
-
Save/apply
Schedules Examples:
-
Homework time: Mon–Fri 4:00 PM – 6:00 PM
-
Bedtime: Sun–Thu 9:30 PM – 7:00 AM
Step 6 — Turn the Schedule ON
On the Pause Schedule page:
-
Turn the Pause Schedule toggle to ON
-
Confirm the schedule is active
✅ Done — the device will automatically lose internet access during scheduled hours.
Optional: Instant Pause or Block
From the same device menu in connected devices section you can also choose:
Pause (temporary)
Best for:
-
“Dinner time”
-
“Come downstairs”
-
“Take a break”
Block (permanent)
Best for:
-
Unknown devices
-
Devices you don’t trust
-
Guests abusing the network
Part 2 — WAN DNS Settings (Safe Browsing / Family Filter)
What Is DNS?
DNS controls how websites load:
-
It converts website names (example: google.com) into IP addresses
-
You can also use DNS to block:
-
malware domains
-
phishing
-
adult sites
-
✅ This helps protect the entire home network (phones, tablets, smart TVs, computers).
Recommended Cloudflare DNS Options
Below are the best Cloudflare DNS servers and when to use them:
Option A — Normal (Fast + Privacy)
Use if you want the fastest/cleanest browsing with no filtering:
-
1.1.1.1 (Primary)
-
1.0.0.1 (Secondary)
✅ Best for: general users, gaming, performance
Option B — Malware Blocking DNS
Use if you want safer browsing without content filtering:
-
1.1.1.2 (Primary)
-
1.0.0.2 (Secondary)
✅ Best for: security protection against malware/phishing
Option C — Family DNS (Malware + Adult Content Filtering)
Use if you want safer browsing for kids:
-
1.1.1.3 (Primary)
-
1.0.0.3 (Secondary)
✅ Best for: homes with kids
✅ Blocks: adult content domains + malware domains
⚠️ Doesn’t block adult content inside allowed platforms (example: Reddit/Discord content inside the same domain may still show)
How to Change WAN DNS on ARIA 2210
-
Log into router admin page
-
Go to: Network → WAN → DNS Settings
-
Change DNS to
-
Enter the DNS pair you want (example Family DNS):
-
Primary DNS: 1.1.1.3
-
Secondary DNS: 1.0.0.3
-
-
Click Save / Apply
-
Recommended: reboot router OR disconnect/reconnect Wi-Fi on devices
⚠️ Important WAN Settings Warning (Do Not Change Other WAN Fields)
Warning: When updating DNS settings, only change the Primary DNS and Secondary DNS fields.
Do NOT change other WAN settings such as:
-
Static IP / Manual IP settings
-
Gateway / Subnet mask
-
WAN mode / connection type
-
VLAN or advanced WAN options
-
PPPoE Details
Entering incorrect values or changing other WAN fields can disable your internet connection or cause intermittent service interruptions.
If you’re unsure, leave all other WAN settings exactly as they are and only update DNS.
Bypass Prevention Notes (Read This — it matters)
This is where most parental controls fail.
If you want parental controls to actually work reliably, you MUST understand these bypass methods.
1) VPN Bypass
If a device uses a VPN:
-
it can bypass DNS filtering
-
it can hide traffic from content filtering
✅ Prevention:
-
Use Apple Screen Time / Google Family Link to restrict VPN apps and more device based parental controls
2) Mobile Data Bypass (LTE/5G)
If a child’s phone has mobile data:
-
they can ignore Wi-Fi restrictions completely
-
Wi-Fi Pause Scheduler affects Wi-Fi only
✅ Prevention:
-
Use Screen Time / Family Link to restrict mobile data usage and more device based parental controls
3) Randomized MAC Address Breaks Scheduling (Big one)
This one is critical.
Modern iPhones/Androids can change their “identity” on Wi-Fi using:
-
Private Wi-Fi Address (iPhone)
-
Randomized MAC Address (Android)
Since the router controls devices using their MAC address, if it changes:
-
the router treats it like a new device
-
schedules may stop applying or apply randomly
Fix for iPhone (recommended before enabling Wi-Fi Pause Scheduler)
-
Settings → Wi-Fi
-
Tap the (i) next to your Wi-Fi network
-
Turn OFF Private Wi-Fi Address
-
Reconnect to Wi-Fi
Fix for Android (recommended before enabling Wi-Fi Pause Scheduler)
Steps vary by brand, but usually:
-
Wi-Fi → select your network
-
Privacy / MAC Address Type
-
Select Use device MAC (not randomized)
✅ After disabling MAC randomization, the scheduler becomes much more reliable.
Best Practice Setup
For the cleanest, strongest setup:
✅ Use Wi-Fi Pause Scheduler for time-based control
✅ Set WAN DNS to 1.1.1.3 / 1.0.0.3 for family filtering
✅ Disable Private Wi-Fi Address / MAC randomization on kids devices
✅ Use Apple Screen Time / Google Family Link to block VPN + mobile data bypass and more device based parental controls
